Updated on April 24, 2024
Gallery Wall Shelves. Create a gallery wall using shelves made of pallet boards. This rustic look can easily be changed to reflect the changing seasons.
Today, I will share with you how I built gallery wall shelves made from pallet boards in the entryway of our living room.
Last year, we installed new laminate flooring throughout most of our home. Since we had to move all our furniture out of each room as we installed the floors, it was the perfect time to assess what our rooms looked like and where we wanted everything to go.

How to Build Pallet Board Shelves
Our living room is not huge, and we already have an oversized sectional couch. This is one of the items I hope to replace sometime in the next year or so.
However, we also have a large 55-gallon fish tank. We had to drain out most of the water to move it, and we thought long and hard before we decided where it would finally end up in the living room.
The fish tank used to take up the wall behind the couch. It spanned the whole wall length and was one of the first things you saw when you walked in. It also made the entryway area seem very closed off and small. So, when we put everything back together in the living room, we moved the fish tank to the opposite wall.
This freed up a lot of space when you walked into our home, but the wall was completely bare now. I wanted to display artwork or decorative pieces in that space and knew exactly what I wanted to build. My vision was a gallery wall that could be changed and display more than just flat-hanging artwork.
Disassemble a Pallet
To build these shelves, we started by disassembling a pallet.

You can do this in several ways, but for this project, we found it easiest to pry the boards apart.
Then, we used our reciprocating saw to cut the nails sticking out that had been attaching the pallet boards together. The nail heads then become part of the rustic charm of the pallet boards, and there is less chance of them splitting apart.
Clean Pallet Boards
Once the boards were removed, I washed them well with soap and water and allowed them to dry in the sun for a full day.
Build Pallet Shelves
To attach the boards together, I used liquid nails along the edge of one board where the two boards would touch.
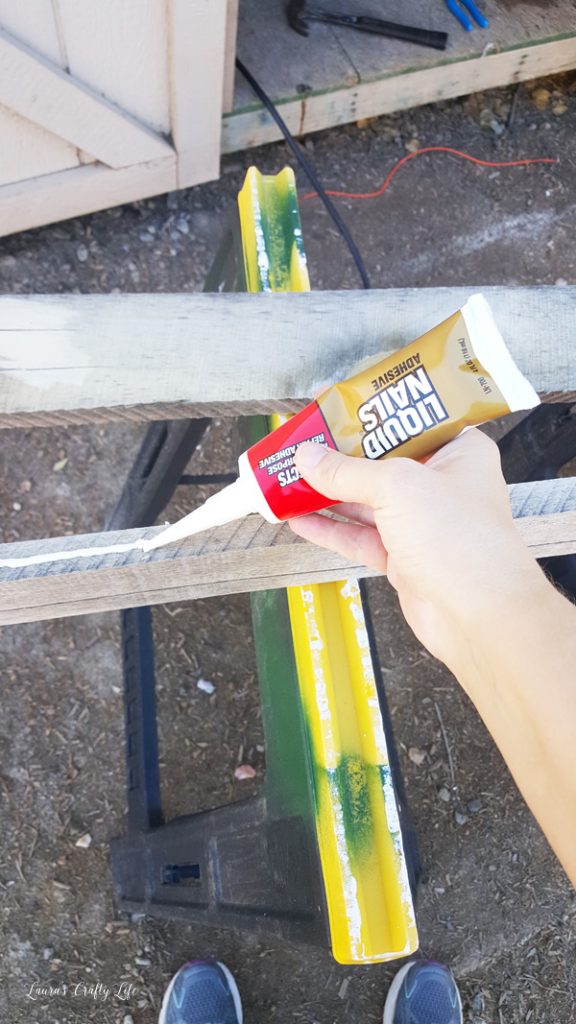
I then attached the boards together with brad nails using our air compressor.

Sand the Boards
After the glue dried, I lightly sanded the boards with my Ryobi JobPlus to remove rough edges.

Hang Shelves on the Wall
To attach the shelves to the wall, we started by using our stud finder to find studs in the walls. I measured the wall and figured out where we needed to place each board and made a mark where we would screw the board directly into the wall into the studs.

While I held the board, my husband used the drill to screw the board directly into the wall. If you cannot find the studs or want to place the shelves in an area where using them wouldn’t work, you will need to use wall anchors to attach them to the wall.
Now, I can display my artwork, collection of ‘S’ letters, and other collectibles.
I love that I can easily change out the display. Since I don’t have a mantel, I display many of our knickknacks on these shelves.

I usually add seasonal decor like banners or printable art to match the season. I don’t have to make a ton of nail holes in the wall to switch things out whenever I want!


You may also like:
Leave a Reply