Updated on March 29, 2022
Among all the craziness of renovating our kitchen, I have been working on decluttering and organizing the rest of my house. One of the places that needs major help is my crafting space. Any of you who have craft supplies knows how this stuff multiplies. There are lots of itty bitty pieces, etc.

This post contains affiliate links. If you purchase something through the link, I may receive a small commission at no extra charge to you. Please read my full disclosure policy here.
Check out the newly updated ribbon organization post where I share how I store ALL my ribbon!
Original Ribbon Storage
One thing I was not happy with was my ribbon storage. My old storage was similar to what many people have with the ribbon being stored on their original spools hanging on the wall. I used some curtain rod holders, spray painted them white and hung them on the wall.
I used inexpensive wooden dowels and painted them green (you can’t see them in the picture). I then painted plain clothespins turquoise blue and used these to keep the dowel from falling off the curtain holder.

I had three rows of ribbons and was getting ready to need to add a fourth row of ribbons.
What I liked about this set up:
- I could see all my ribbon at once.
What I did not like about it:
- It takes up a lot of wall space.
- The ribbons would get dusty.
- Sometimes a ribbon would just fall off the spool.
- If I wanted to use ribbon somewhere other than my craft room I had to take the whole thing down and half the ribbons off to get to the one I wanted.
So, this wasn’t really working for me anymore, I started doing some research on different storage options. I didn’t want to spend a lot of money (under $5) and the new storage needed to address my concerns above while still allowing me to see all my ribbon at once. Pretty tall order, right? I actually found so many great ideas. You have to love Google Image!
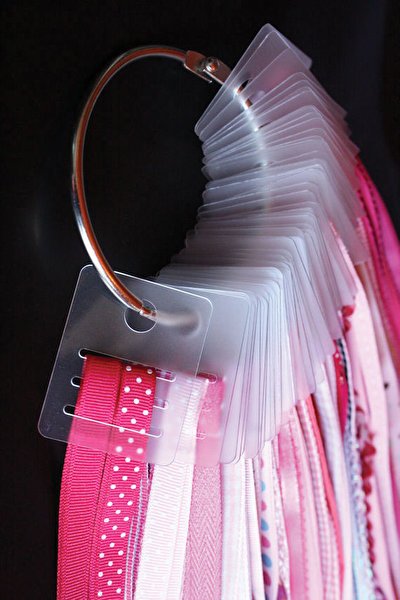
Option 1: Ribbon Ring

Source: paperwishes.com
As much as I really like this idea, I didn’t think it was going to work for me. For one, it was going to cost too much money. It isn’t overly expensive but wouldn’t keep me within my insanely low $5 budget! Plus, I have small kids. And cats. I could see this turning into a huge mess of a disaster. It sure does look pretty, though, doesn’t it?

I love this idea because each individual spool can be taken out easily. Since spools are not hanging on a rod then you don’t have to worry about the ribbon falling off them either. But, this didn’t really save any space for me and it is not a cheap project when you figure in all the end cap pieces for the gutter. Also, it does not address the dust issue either. So, onto option #3.

Okay, this was getting closer. This was inexpensive enough. All you need is a basket – which I already have a ton of – and foam board. You can get this at Dollar Tree super cheap! But, as much as I love, love, love this idea, I have a lot of ribbons. And not just your traditional thin scrapbooking ribbon. I have a lot that is 1″ to 3″ wide. So, unfortunately, this was not going to work for me. The search continues . . .
This was perfect for me. Each ribbon is wrapped up on its own little cardboard square. And the squares could fit in a small plastic bin of sorts. (I don’t have nearly as much ribbon as pictured above!). She used those 12 x 12 three drawer bins. I would never fill even one drawer! But the idea seed was planted and I was off to get started.

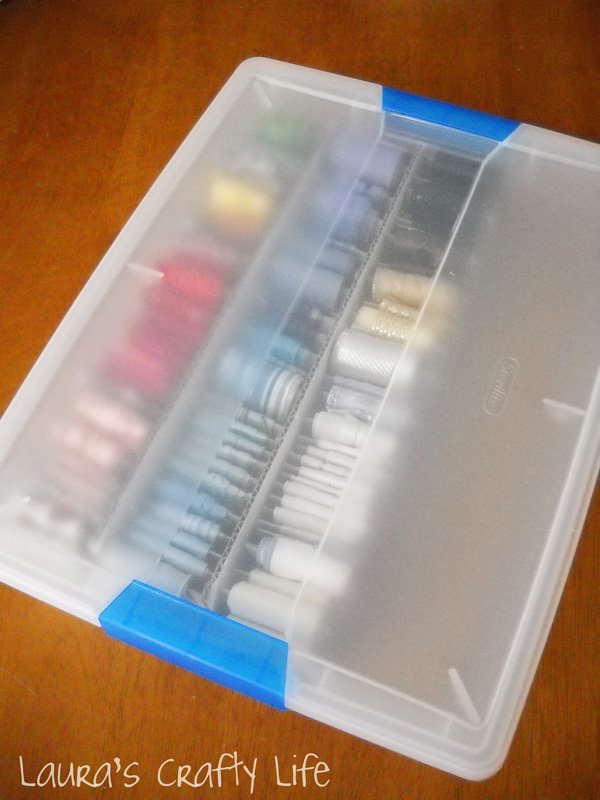
This is what it looked like when I was finished. I found a cheap ($3.50) plastic box with a lid at Dollar General. It was originally intended for 8 1/2″ x 11″ paper storage. I had all the cardboard on hand to make the little cards. Each card ended up being approximately 2″ x 2″. The dividers are made out of an old corrugated cardboard box cut to fit. As you can see I still have a whole row I can add ribbon to!

With the lid on I don’t have to worry about the ribbon getting dusty or ribbon falling out. Plus the blue handles lock the lid down – perfect to keep out prying kid hands and curious cats!

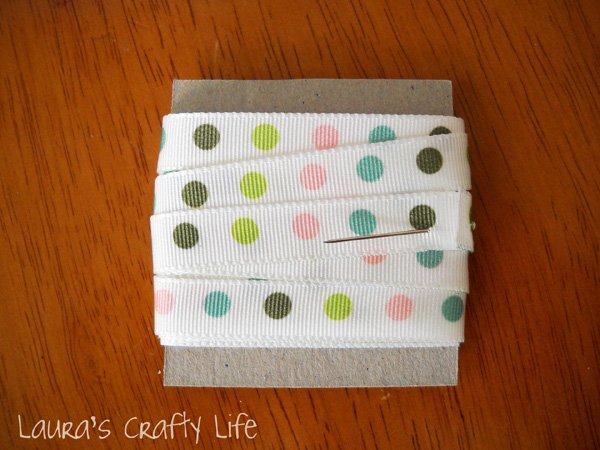
Each ribbon is wrapped around a cardboard square and then secured with a pin. You could also use a small rubber band to secure your ribbon.

This takes up way less space and seems to be working perfectly. I can take this little box anywhere I need to. I am still trying to finalize what I am going to do with my ribbon that is more than 2″ wide.
You may also like:

Emily Stewart says
I teach elementary school with Melissa Bickle, inventor of the Ribbon Ring! She passed along her business to me this year, and I’d like to change your mind!
Get in touch :)
-Emily Stewart
Ribbonlady@sunshineribbonrings.com
http://Www.sunshineribbonrings.com
Valerie says
Are ,you still storing your ribbons this way?
A question, do you know about how long each length of ribbon is (assuming a new roll), are any too long and make this method less functional?
At first i wasn’t crazy about your idea, but i do like the space saving feature. I have *A LOT* of ribbon and cringed at the thought of re-rolling it all. Didn’t consider the dust factor because mine are in boxes (clear) but varying sizes.
Love the idea of being able to sort them by color better.
Thank you!
Laura Silva says
Valerie,
Thanks so much for reaching out. I do still store my ribbons this way. I would say the really thin ribbon that comes with 5 or 6 yards per roll doesn’t work well with this method. I use a Deflecto ribbon dispenser for those thinner ribbons that I keep on the roll. It works great for those and keeps them protected. Also, you can definitely make larger cardboard pieces for your wider ribbon, but I show how I store that ribbon in this updated post: https://www.laurascraftylife.com/ribbon-storage-organization/. I definitely know what you are saying about re-rolling all the ribbon. I did mine in stages while watching TV. But this method takes up so much less room than having all those ribbons on rolls, and I can see exactly what I have at a glance when working on projects. I hope that helps!
xo,
Laura
Juliana @ Te Amo Too says
Hi Laura, I loved how you cut your own cards and made that cardboard division. I just wanted to let you know that I linked up your post on mine today! I hope you don’t mind :)
Laura Silva says
Thank you! I don’t mind at all. Have a great week.
xo,
Laura
L. Seeb says
I basically use this same method to store my ribbon. I use leftover mattboard that I got for free from a local frame shop and wrap my ribbon around the same size pieces that you do…2 1/4″ x 2″. I store my large ribbon differently though. When I put the cardboard in the drawer to mark the rows for the ribbon, I leave the last row(s) double the width of the other rows. Then I cut several pieces of the mattboard 2 1/4″ x 4″ …double the size so that I can wrap the wider ribbon onto these cards. I can still use the double wide row in my drawer for the regular width ribbons if I need to by lining these up in front of my larger ribbon. There just isn’t a cardboard divider between them, but it still works just fine and my larger ribbon is stored in the same basic way and in the same container(s) as all my other ribbon. Hopefully this makes sense!!
Laura Silva says
Great idea! Thank you for sharing.
xo,
Laura
tajicat says
Love your great idea for the ribbon. I am in the process of fixing a tiny room as a craft room now that my kids are grown. I need the most compact ways and this is the best I have seen. :)
Laura Silva says
Thanks so much! I still store my ribbon this way. It works so well and I just add to it whenever I purchase new ribbon. It holds so much and keeps it all dust free! Have a wonderful week!
Andrea says
I’m in the process of doing the same thing. I bought some plastic mesh canvas at Michaels and I’m going to cut into pieces to fit the wider ribbons.
Laura Silva says
That is a great idea! I still organize my ribbons this way. It has really served me well!
Debra says
Just found this today. Been looking for a good way to do ribbon storage. Thanks! Did you ever figure out how to store your large ribbons?
Lauras Crafty Life says
Yes! Basically I used the same exact storage container. I wrapped the large ribbon around my hand and put each one in a snack size ziploc bag. They are all stored neatly in the container. I will hopefully be posting a lot more about my craft storage really soon, but right now we are knee deep in a kitchen renovation! :)
Jean H says
So you do not put on cardboard? The zip lock bags sound great will give try when I get my craft half room finished
Laura Silva says
Jean,
All the smaller, thinner ribbons are on cardboard like it shows in the post. The larger ribbons that are too wide for the cardboard squares I put in the plastic bags. You can see how I organize all the different types of ribbon in my craft room in this post: https://www.laurascraftylife.com/2017/05/ribbon-storage-organization.html.
Laura
{Bellamere Cottage} says
Great tip…. I have a basket…..ok two………ok……maybe three or four FILLED with ribbon that is always all knotted up and tough to find what I want. This is a great solution.
Blessings,
Spencer
debmuc says
This is an amazing idea – i keep mine in plastic drawers but still on the spools. I bet if i put them on the cardboard pieces i wouldn’t need so many drawers lol – or i’d have room for more ribbon as i already have them lol! Thanks!
Anonymous says
That lightbulb tip is amazing! !!
Debbie Bolduc says
Great idea!
Anonymous says
Do you find that your ribbon has folds in it??
Lauras Crafty Life says
Some of the thinner ribbons have folds in them, especially as you get closer to the cardboard. I did find a great tip on Pinterest for that though! If you don’t want to iron your ribbon, just run it along the top of a lightbulb that is turned on. It “irons” the wrinkles right out!
dolores says
I don’t have hot light bulbs anymore with the new energy saver/daylight balanced bulbs but a cheap hair straightener works too.
Now i’m thinking I could also use my embossing heat tool (Wrap ribbon around a jar [or can?] and heat?). My embossing heat tool is always available and plugged in…but I’d have to get a hair straightener and wait for that to heat up.
dolores
Laura Silva says
I bet that would work great! I would still probably test a small area of each ribbon first though to be sure it is not too hot to melt the ribbon. Let me know how it works!
Laura
Martha says
I like your idea!! I can’t use the wall space and as you say the dust does not get to them…off to cut up some cardboard!….Martha
Libby says
Wow…what a simple idea…thanks for sharing!
Dee says
Love this idea! I like how you find a way to organize the ribbon, take up less space, and on a budget! ~Dee
FlyAwayHome says
Laura, I love this idea. Takes up so little room. Thanks for sharing. I found your site because you had pinterested my snack bag tutorial… so glad you did because it brought me to your site. Great ideas!